Best Camera Settings in Rocket League - Guide by Rivalry
With millions of copies sold since its release, Rocket League is a highly popular game that can entertain you even more than standard football titles like FIFA. At the moment, this esport is thriving and its tournaments offer millions of dollars in prizes. Rivalry covers every important event for those who want to bet on the game. If you’re new to it, this guide will introduce you to the best camera settings in Rocket League.

The Importance of Choosing the Best Camera Settings in Rocket League
Rocket League is basically football played with cars. And because of that, your view of the arena and everything that happens in it can change dramatically during a game. Every scene will use a different angle and this continuous movement can either enhance or ruin your experience. Therefore, using the best camera settings in Rocket League is crucial.
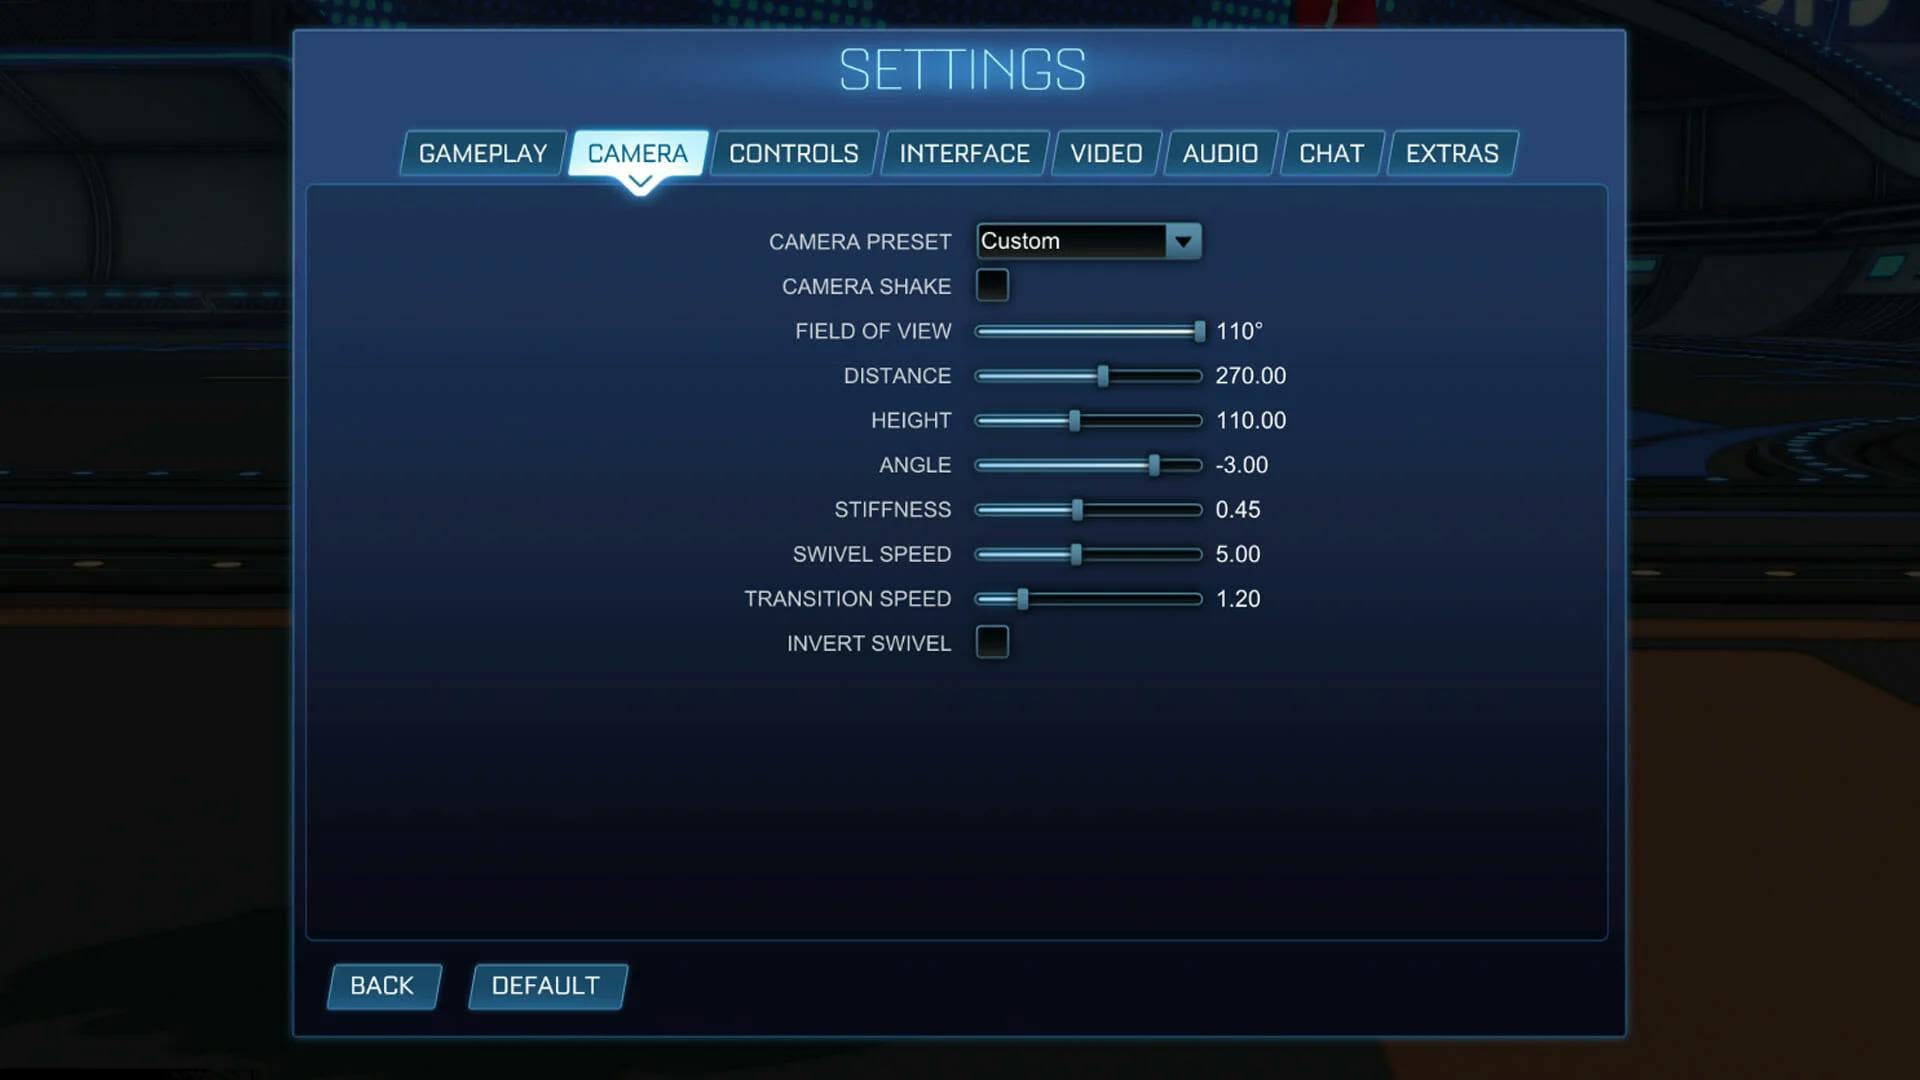
Before we get into specifics, these are the Rocket League settings that we’ll be working with:
· Field of View
· Distance
· Height
· Angle
· Stiffness
· Swivel Speed
· Transition Speed
· Camera Shake
These are important settings because they’re used continuously throughout the game. And you’ll understand why once you learn what they do.

How to Choose the Best Camera Settings in Rocket League
If you play Rocket League on a regular basis, you’ve probably already experimented with the game’s settings and developed your own unique way of keeping track of the ball, the opponent’s cars, and your own. But if you’re a new player, you may not even know where to start. These are the Rocket League settings you’ll need to work with.
The Best Rocket League Camera Settings for Field of View
Field of View (or FOV) is one of the first settings you’ll find in the Camera tab of your Rocket League Settings Menu. This option is extremely important because it lets you determine how much of the stadium you can see at any given time.
In competitive gaming, access to information is key. The quality of your decisions depends upon the information you have at your disposal in the seconds that precede each important move. In games like LoL or Dota 2 for instance, you have a minimap and most players look at it every few seconds to update their knowledge of what is going on.
In Rocket League you get to see the arena in which the action takes place. And to see more of it, you’ll need to set your Field of View to a higher value. Most Rocket League pros prefer the maximum value, which is 110 degrees. This makes perfect sense given that the car models are big enough to be seen with ease even from higher up. Whenever you can choose to have more information available to you, it’s a good idea to make use of it. Especially if there’s no real trade-off.

The Best Rocket League Camera Settings for Distance
In Rocket League, the camera distance setting allows you to determine the precise distance between your camera and your car. So a higher value means that you will see your car from a greater distance. Just as with Field of View, most Rocket League players seem to be quite sure that one value is better than the rest. And that value is 270. You can use a smaller distance or a greater one, but 270 seems to be the number that will give you access to all the information you need while not obscuring your ability to see and control your car with great precision. So it’s probably your best bet.
The only exception to this rule is when you’re playing with family members for whom having fun is the most important thing. Some people enjoy seeing the car models from a shorter distance and don’t care as much about maximizing their competitive advantage. In such situations, you might want to consider switching your Rocket League camera settings for Distance to a lower value, such as 200.
Rocket League Camera Settings for Height

The Height Camera Setting allows you to choose how far above the camera sits above your car model. Getting this number just right is not as important as it is for the first two settings. But using a really bad value can still ruin your chances of winning tough matches against opponents of equal skill.
The best Rocket League players seem to agree that 110 is the perfect camera height in Rocket League, but there are quite a few of them who use other values, such as 100, 130, or even 80. The best thing to do is to experiment with values between 95 and 125 and see what feels the most natural in your case.
Rocket League Camera Settings for Angle
When it comes to Rocket League settings for Angle, the differences between the various values are not that noticeable. Most pros seem to agree that a value of -3.00 or -4.00 is the way to go, but some use a value of -5.00. Don’t be afraid to experiment with this one because the effects are so small you won’t even feel them unless you go to the extremes and compare the results. It’s probably best to start with a camera angle of -3.00 and then go to the min and the max value to see the difference. In most cases, you’ll go back to -3.00 or perhaps -4.00 and then move on to experimenting with the other Rocket League settings.

Rocket League Camera Settings for Stiffness
In Rocket League, the best Camera Settings for Stiffness can vary wildly. Some pros go as low as 0.30 while others go as high as 1.00. The optimal value seems to be 0.45.
Camera stiffness gives you the ability to tell your camera to follow your car more tightly or more loosely while you’re speeding up. Lower values of this Rocket League camera setting will give you the possibility to get a better view of the stadium, which is why you should probably stick to values smaller than 0.50. Keep in mind that while playing a match of Rocket League, you will be speeding up rather frequently. And every time you do that, the Stiffness value you’ve chosen for your camera settings will determine how much information you can access.
Rocket League Camera Settings for Swivel Speed
When it comes to camera swivel speed in Rocket League, you should aim for a high speed value because this setting allows your camera to move faster around your car. Start from a value of 5 or 6 and experiment with the extremes, just so you can get a better feel for what this setting does.
Rocket League Camera Settings for Transition Speed
The Transition Speed camera setting for Rocket League determines how fast the camera will move when switching to ball camera. This is important because you’ll often go from not having to ball to having it, and a faster transition might give you an advantage. Therefore, it’s best to choose a value between 1.20 and 1.50. Professional Rocket League players tend to prefer the lower end of that interval because they’re used to the speed. If you’re a newer player, consider a slightly higher value. But don’t exceed 1.50.

Camera Shake & Invert Swivel
In Rocket League, Camera Shake and Invert Swivel are two options that almost nobody cares about. For ease of play, always set the Camera Shake to off (or No). The same goes for Invert Swivel. You really don’t need these fancy settings and messing with them may ruin your ability to play the game.
How to Experiment with Rocket League Camera Settings
If you’re one of those players who like to customize everything based on personal preference, you can find your own success recipe when it comes to the best camera settings in Rocket League. The method is quite simple. Just use the default value in each case (or the values provided in this guide) and then start tweaking one setting at a time. To to the minimum value, and then go to the maximum value. Get a feel for both extremes and then experiment with every single value in between.
The important thing here is to discover the perfect value relative to your own playstyle in steps, making one change at a time. This approach will allow you to notice what caused the improvement or, on the contrary, what made the experience worse. If you try to change too many things at once, it will be hard for you to tell what changes are still necessary for a perfect experience.
FAQs
Here are some of the most frequently asked questions about the best settings for Rocket League.
How Do I Change My Camera Settings in Rocket League?
Simply find the Camera tab in the Settings Menu. Every setting that was discussed in this guide can be modified there.
Is There a Difference Between the Best Rocket League camera settings for PC and the ones for consoles like Xbox or PS4?
No. When you play Rocket League, the best camera settings for PC coincide with the best Rocket League controller settings. So, the best Rocket League settings for Xbox and the best Rocket League settings for PS4 need no modifications once you’ve discovered the optimal values for a keyboard + mouse setup.


